Measuring for Wooden Blinds

Select Your Window Type

Standard Window

Choose your fit

Multiple fitting options are available for standard windows.

Choose from the options below

Option 1: Inside Recess
Follow the steps below to install your blind within your window recess. Recommended
Option 2: Exact Size
Follow the steps below if you know your exact width and drop requirements.
Option 3: Split Window
Span a single window recess using multiple blinds. An excellent choice for windows that are larger or have a clear split.

Inside Recess

Step 1 – Width Measurement

recess oo45t3

Step 1 – Width Measurement

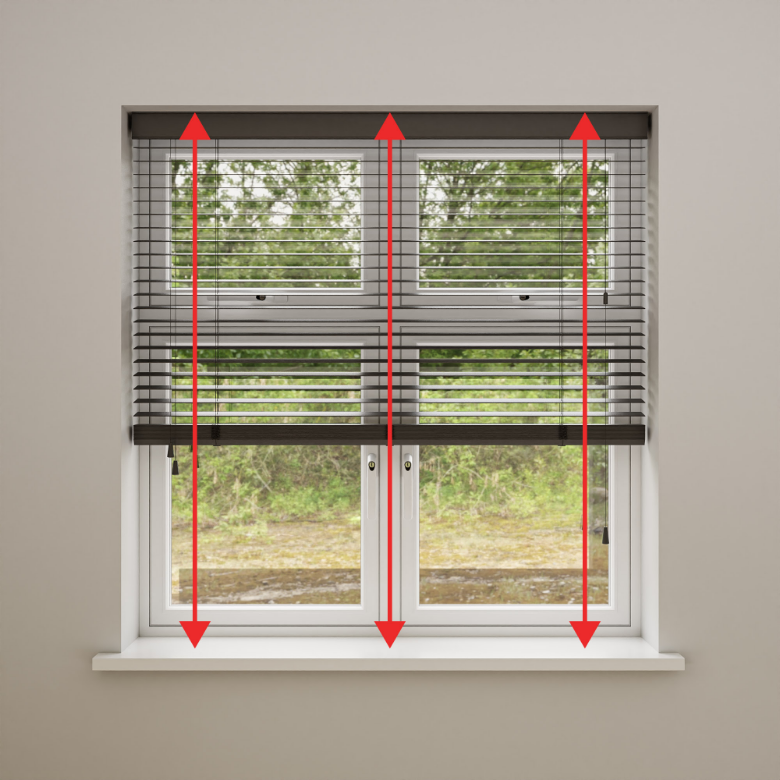
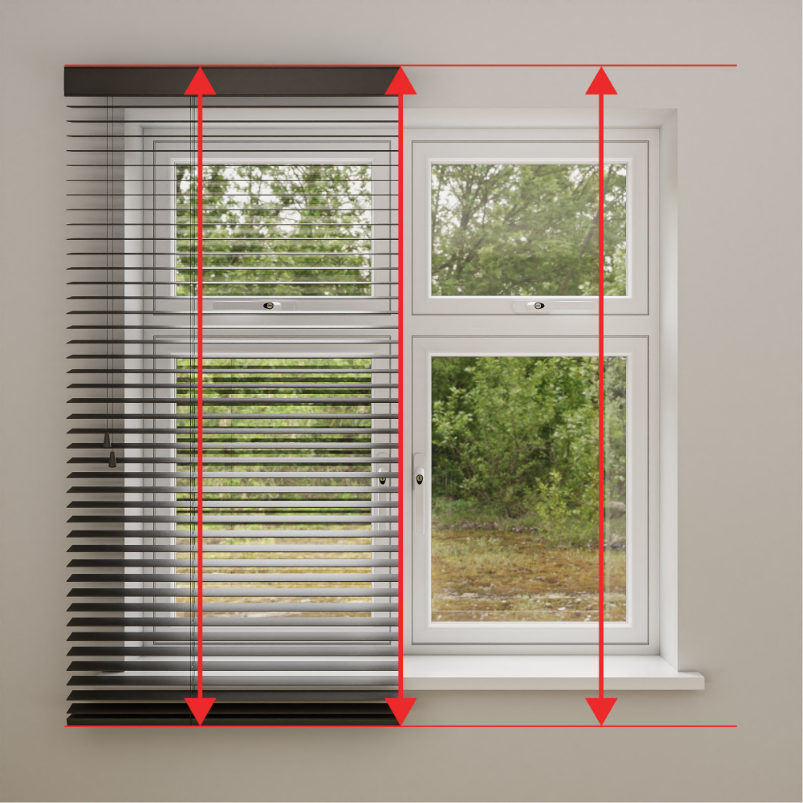
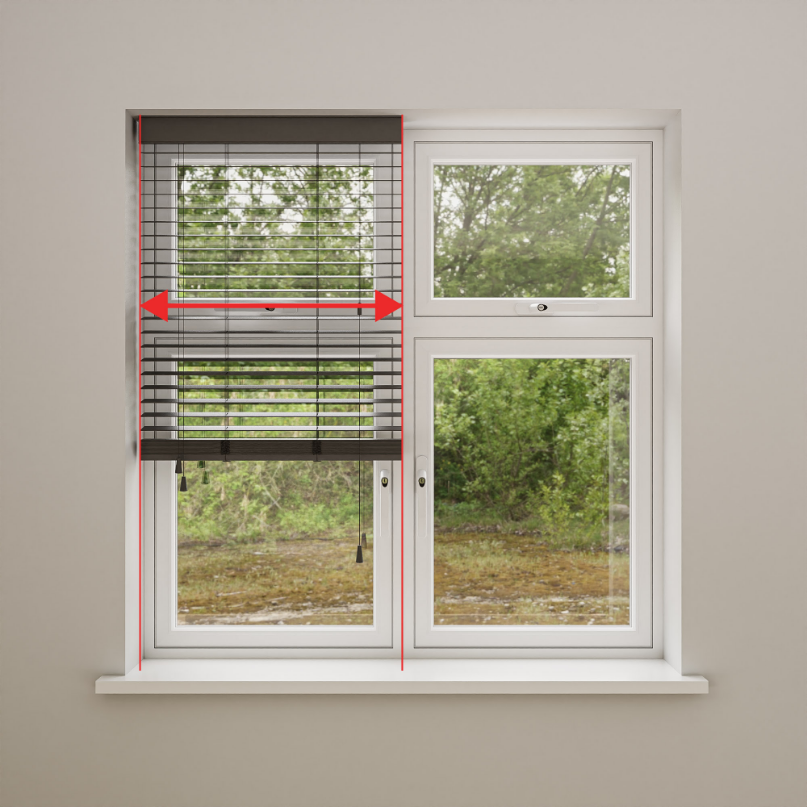
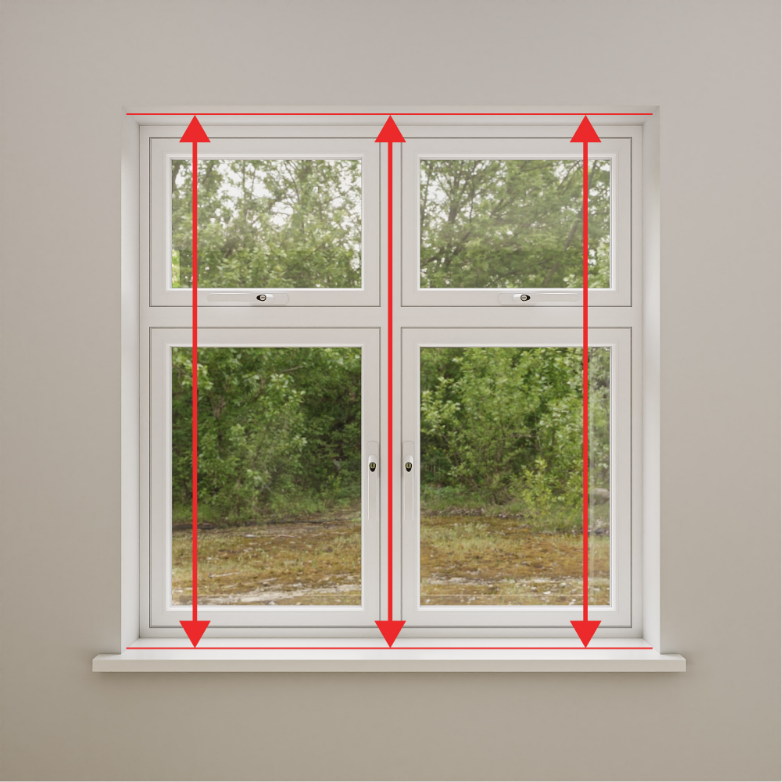
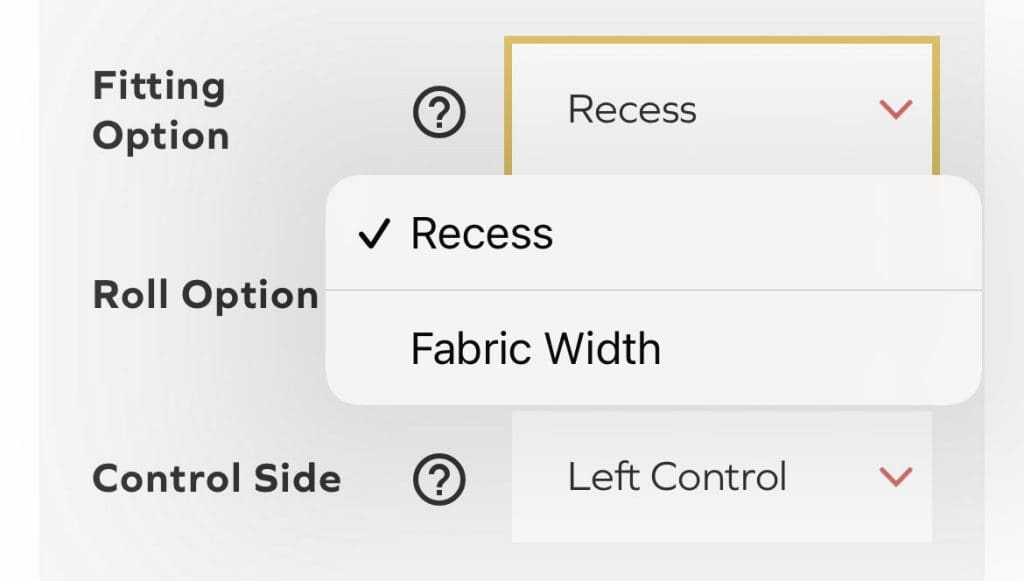
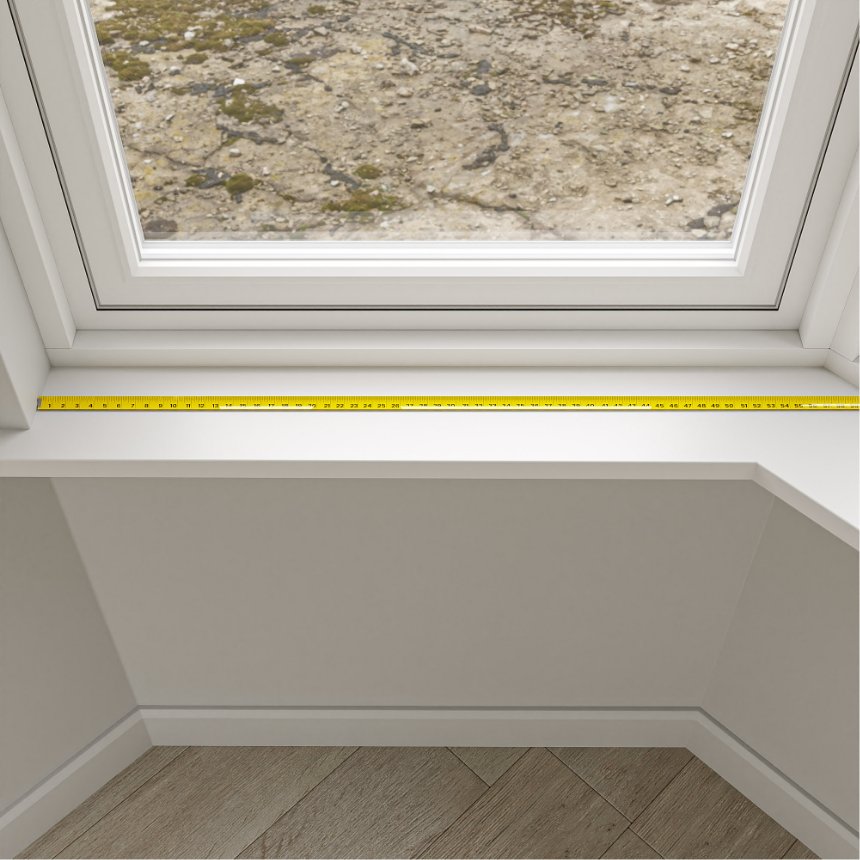
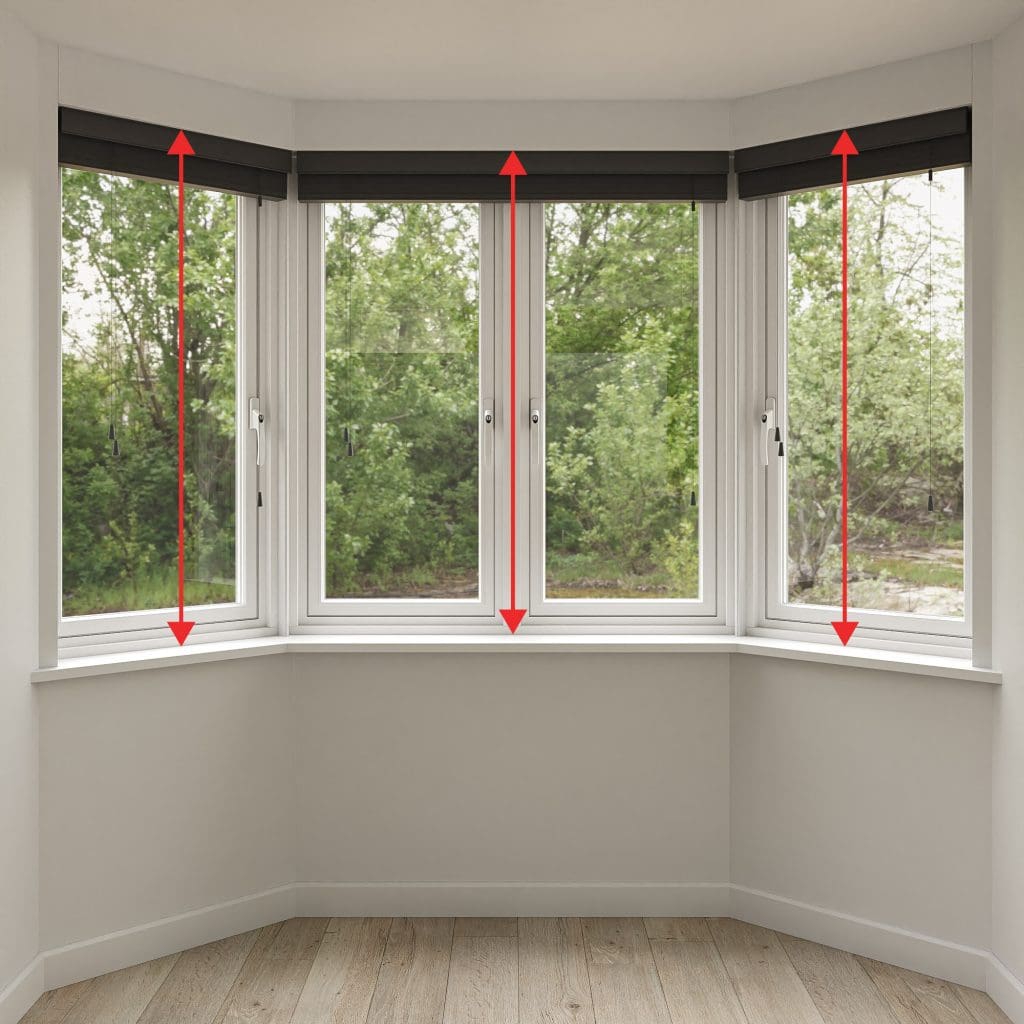
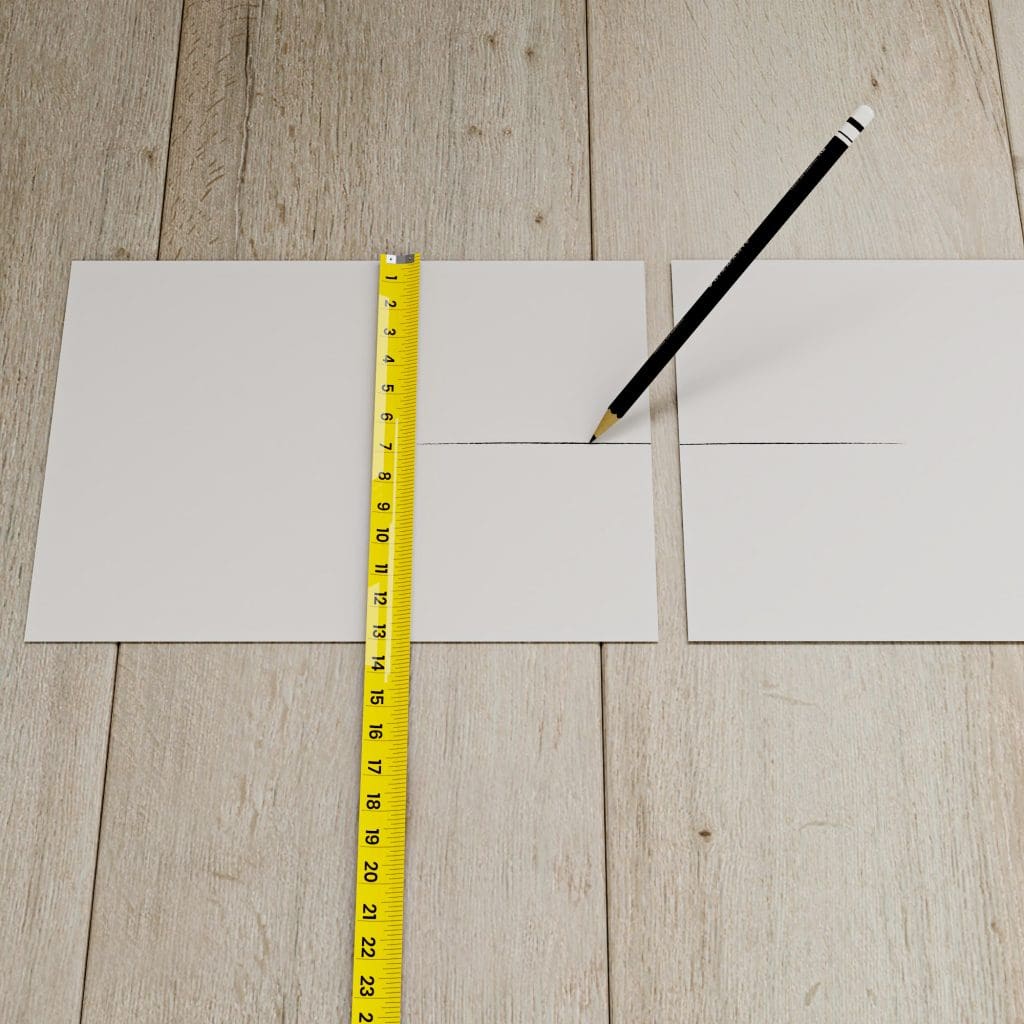
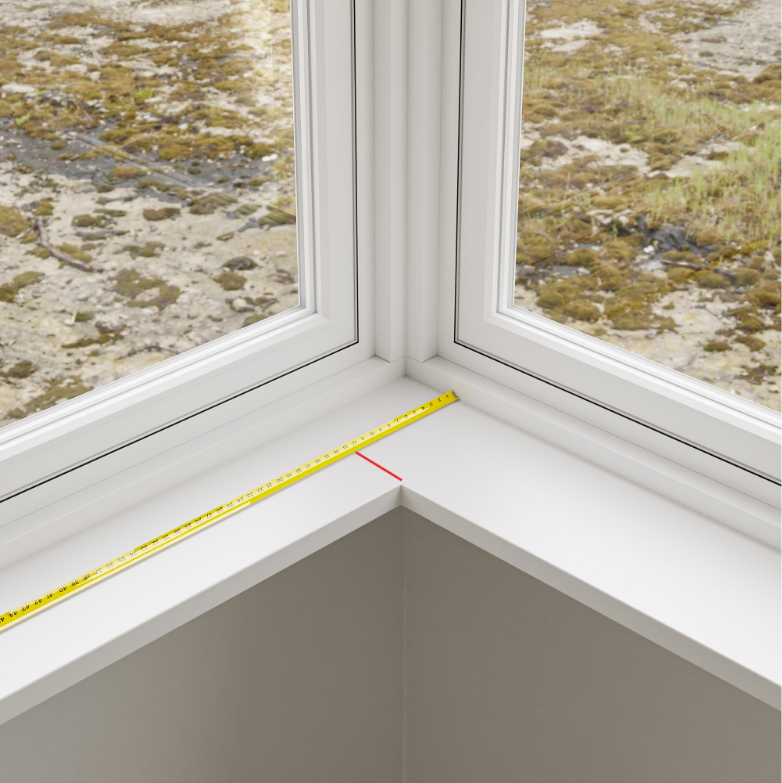
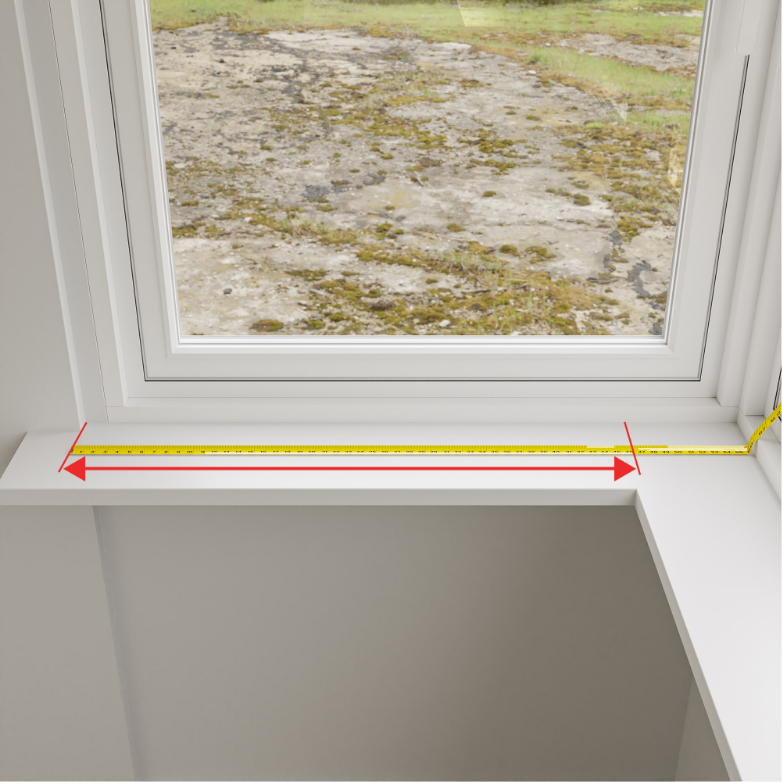
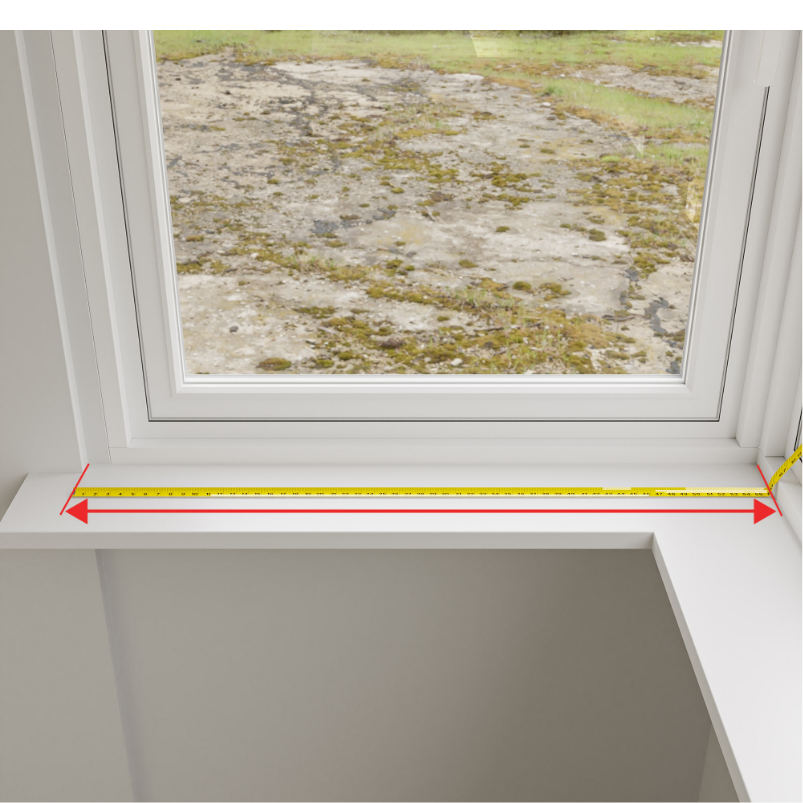
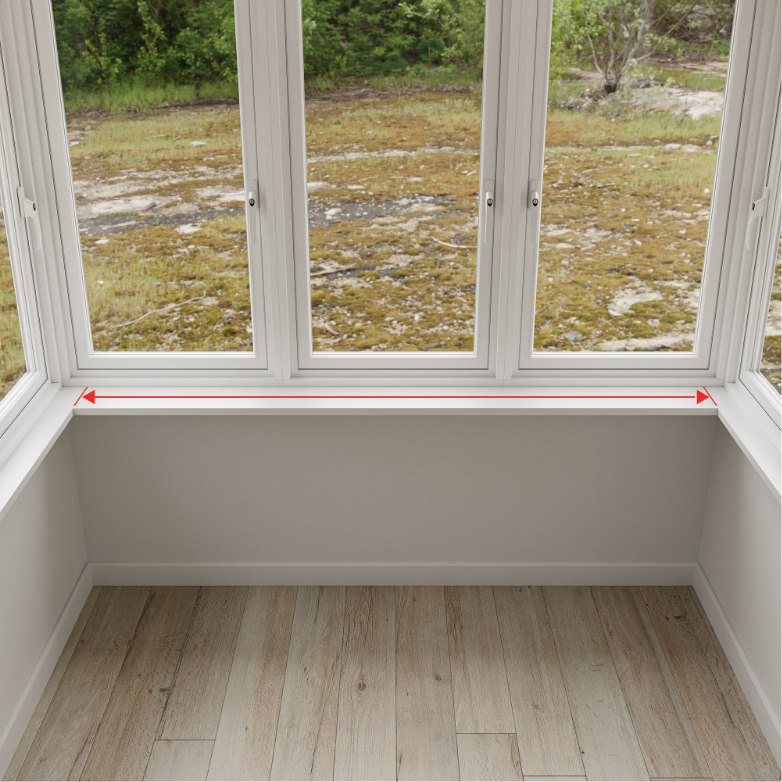
To determine the width for your blind, measure the recess at three points. Use the smallest measurement when placing your order.

Important!

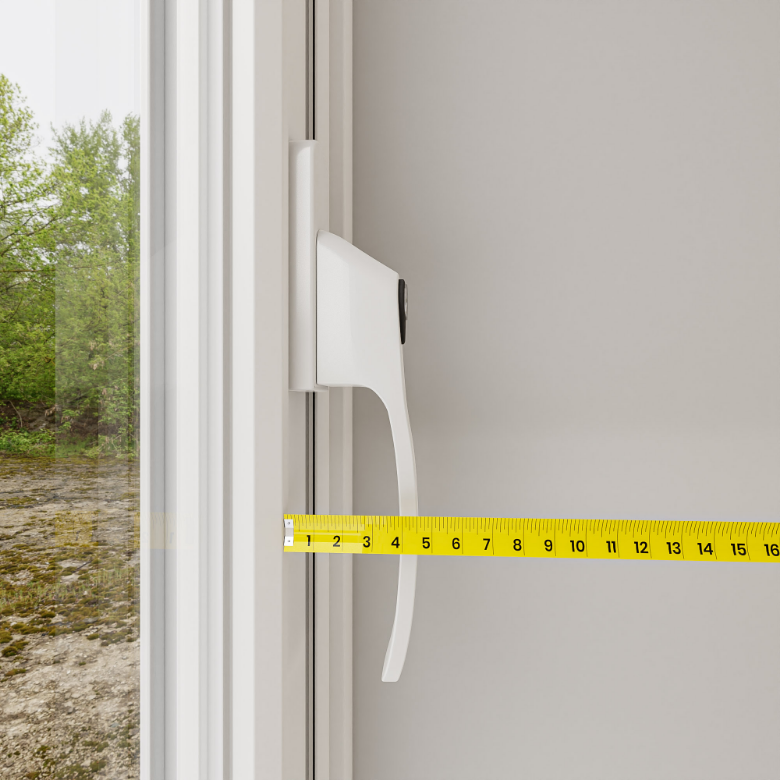
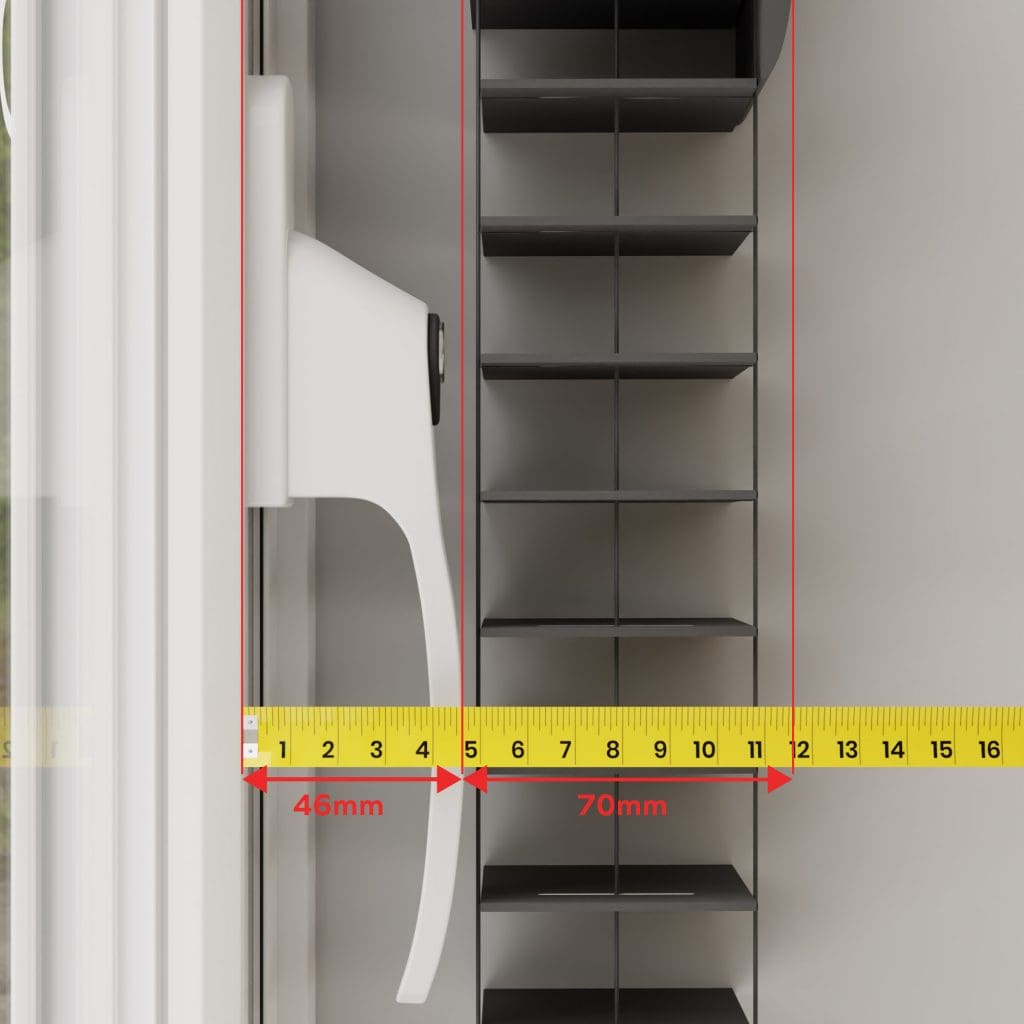
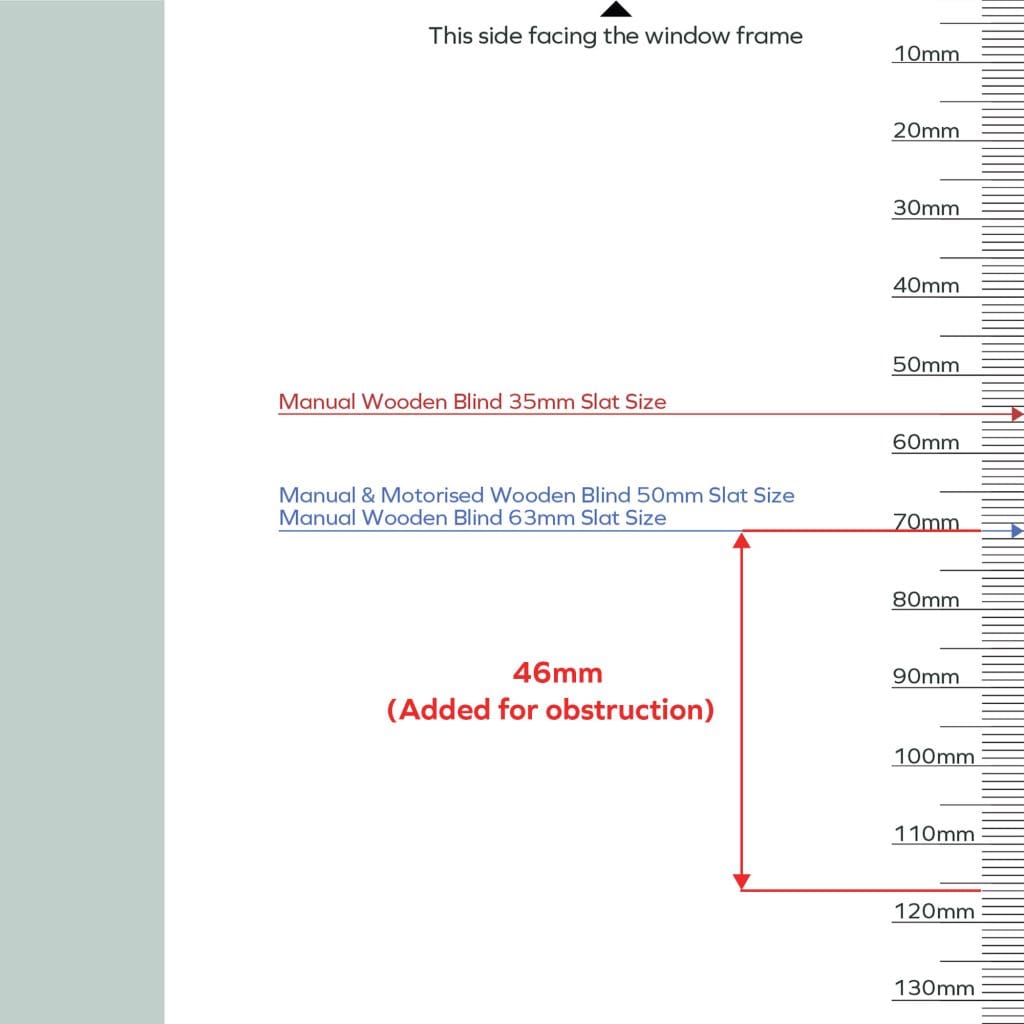
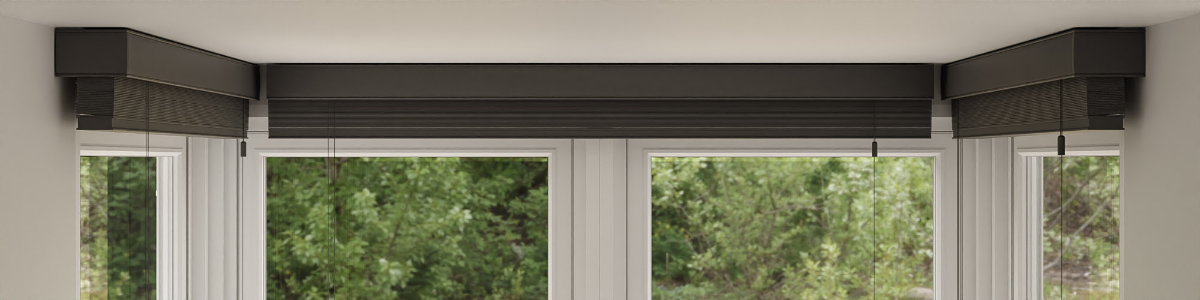
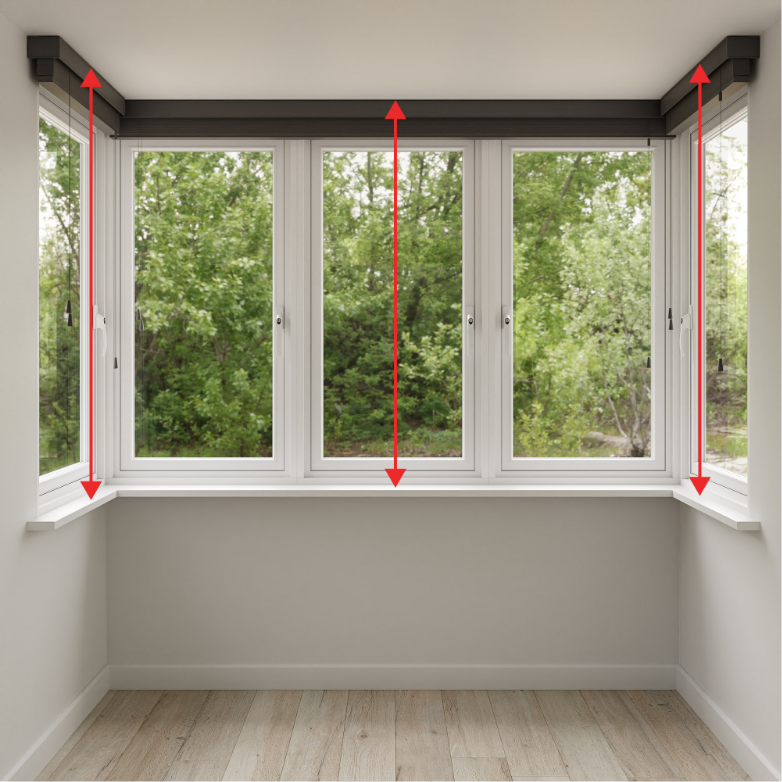
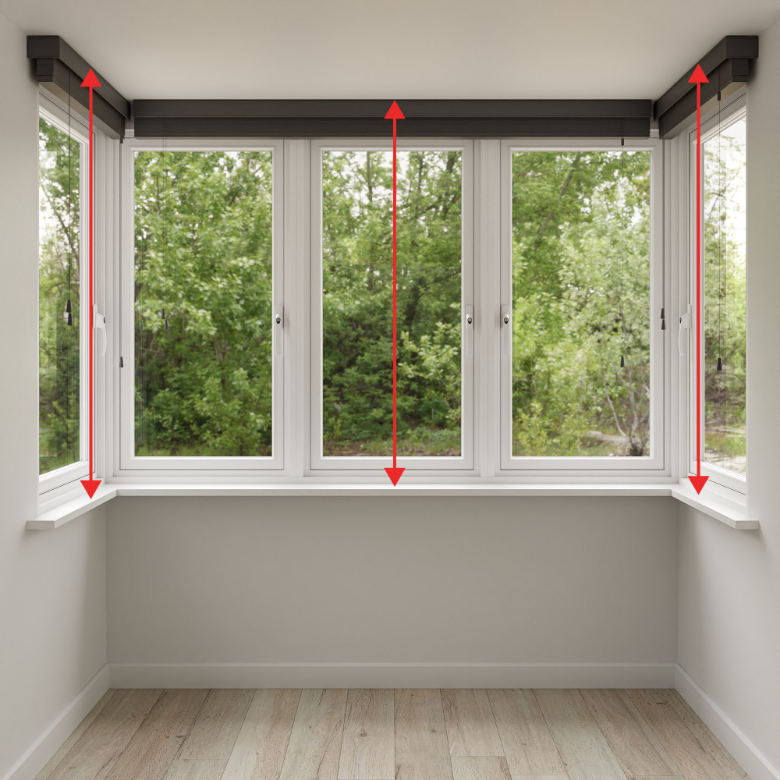
Depth check – Ensure proper operation of your blind by ensuring there is sufficient depth clearance. For 35mm slats, allow 55mm, and for 50mm or 63mm slats, ensure 70mm of clearance from the farthest point of any obstruction to the front of the recess.

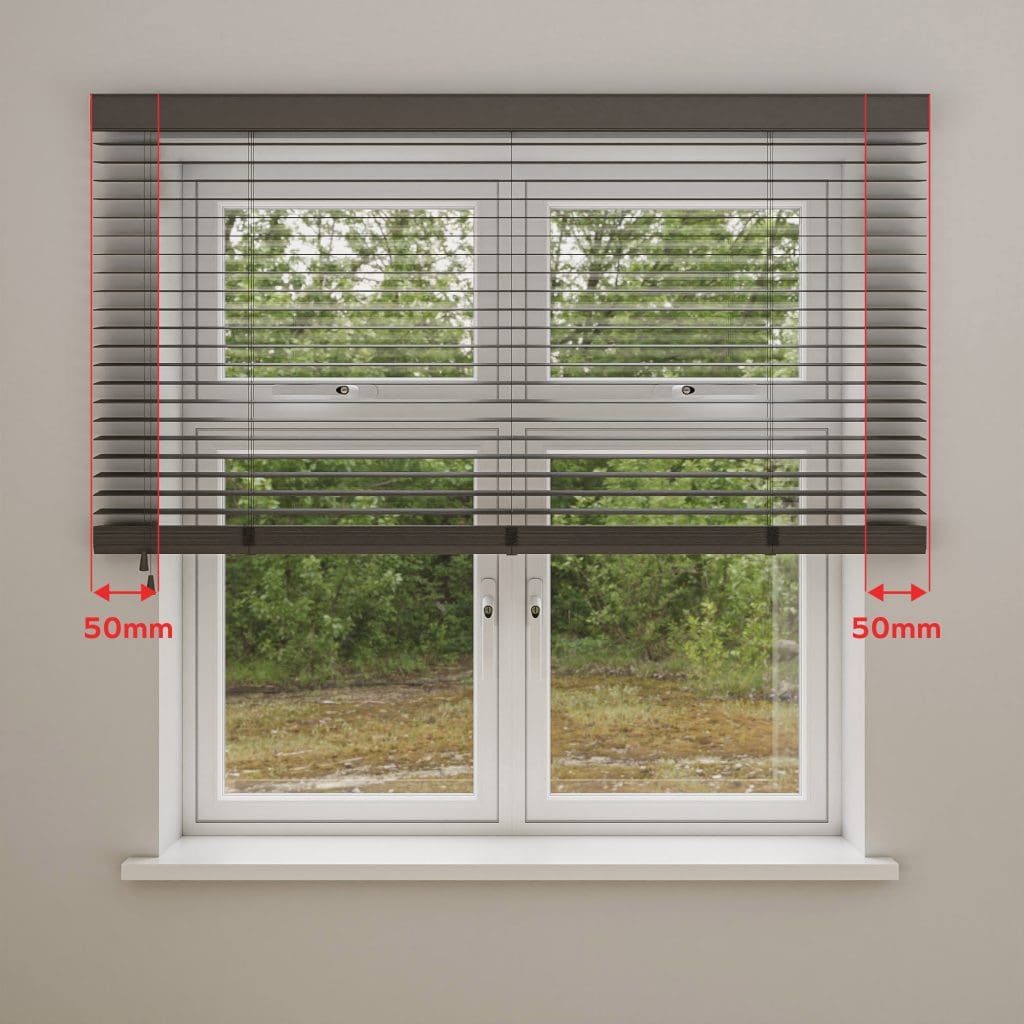
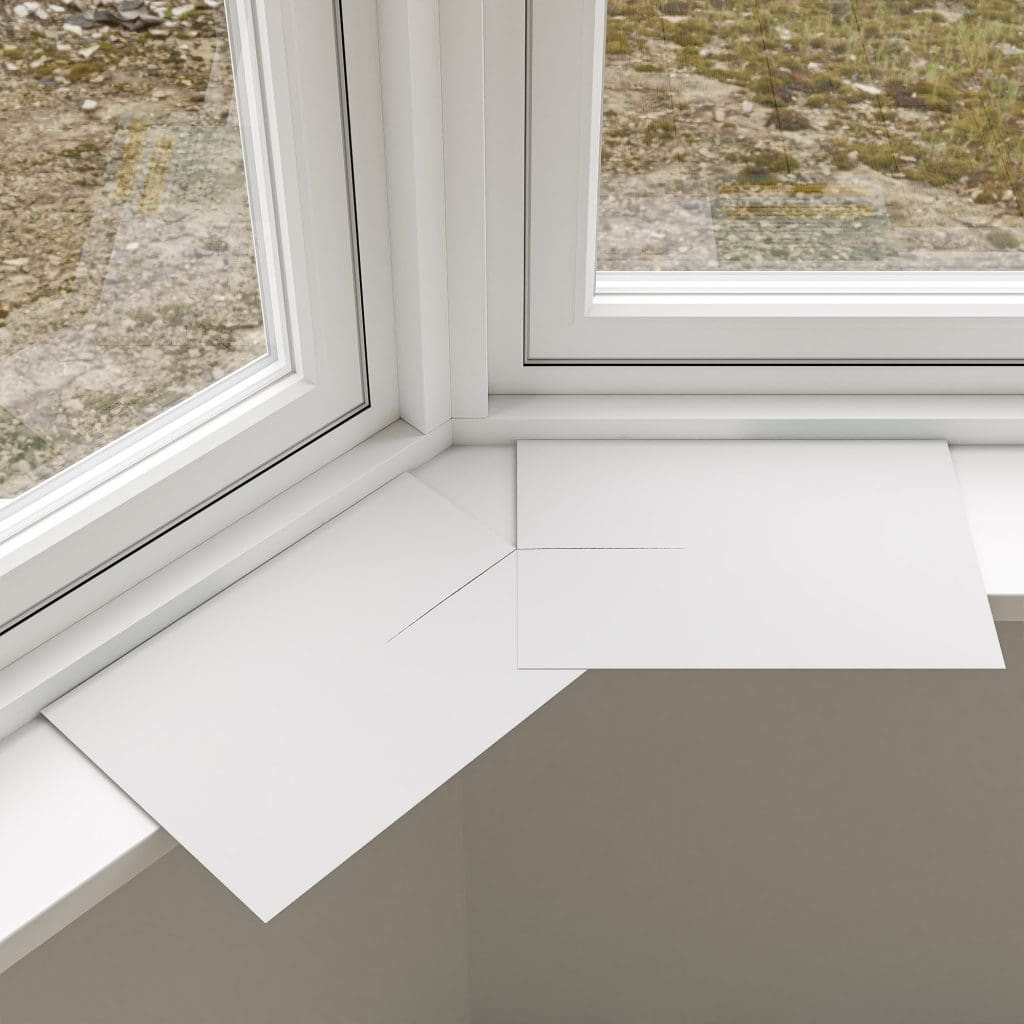
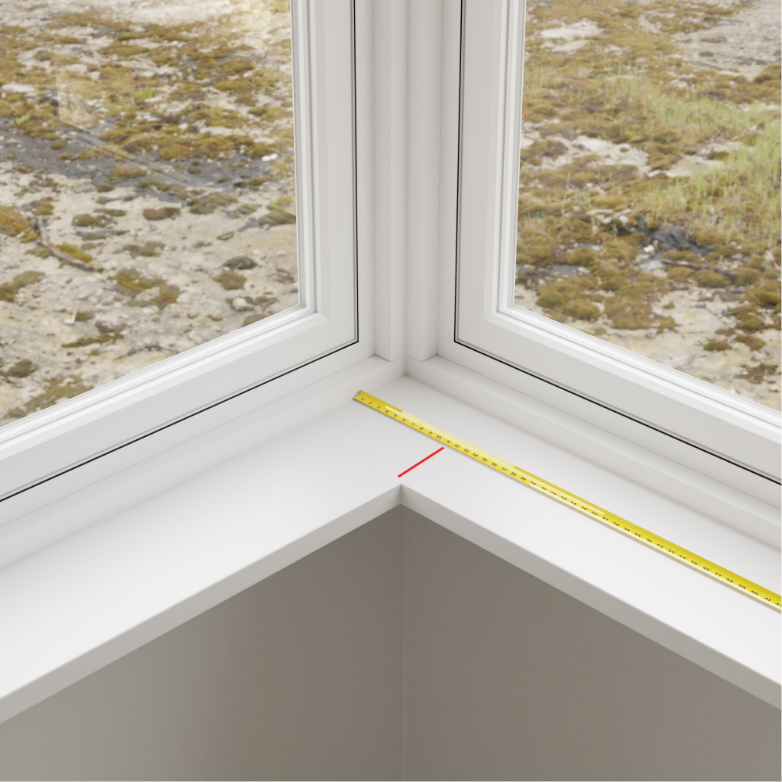
Check for width obstructions – Account for any obstructions like tiles in your recess, which may affect its effective width. Measure between these points and use this figure as your width measurement when ordering your blind. For wider tops, consider ordering an uncut pelmet that can be tailored to fill the full width at the top of your window recess.

Step 2 – Drop Measurements

recess anot ql0clu

Step 2 – Drop Measurements

Measure the recess height where you intend to install your blind, measuring at three separate points. Use the smallest of these figures as your drop measurement when making your order.

Step 3 – Recess Fitting Option

Recess all other eupvc2

Step 3 – Recess Fitting Option

When ordering your blind, select the “Recess” fitting option. We’ll then adjust the measurement to allow for the appropriate brackets.

HAPPY MEASURING? SHOP WOODEN BLINDS

Exact Size

Step 1 – Width Measurement

Wood Motorised wfqqie

Step 1 – Width Measurement

How far on each side do you want your blind to overlap your window recess? Be sure to include this overlap when making your width measurement.

Important!

Overlap – For optimal results, we recommend a 50mm overlap on each side of the window recess. This entails adding an extra 100mm to your width measurement (on top of the recess width). Keep an eye out for potential obstructions, like light switches, to ensure the blind’s overlap doesn’t conflict with any objects.

Improved light exclusion – Your blinds will eliminate light from outside more effectively if the overlap is greater.

Step 2 – Drop Measurements

exact cut annot nxzu72

Step 2 – Drop Measurements

First determine where you’d like your headrail and bottom bar to be positioned. Measure the distance between these two heights, from the top of the headrail to the bottom of the bottom bar, and use this as your drop measurement when ordering your blind.

Important!

Overlap (top) – We suggest an overlap of at least 70mm beyond the top of the window recess.

Overlap (bottom) – Top tip: Obstructions, such as a radiator, may limit your bottom overlap. If the window sill protrudes by over 50mm, your bottom bar should be placed at this point. Otherwise, the amount of bottom overlap is a matter of personal taste.

Step 3 – Exact Fitting Option

Exact Blind Size exact uf7bls

Step 3 – Exact Fitting Option

When making your order, select the “Exact” fitting option.

HAPPY MEASURING? SHOP WOODEN BLINDS

Option 3: Split Window

Step 1 – Split Point

Split just window annot 1 cbryew

Step 1 – Split Point

Mark with a pencil the point where you’d like to split your blinds.

Handy Suggestions

Your split point – Though the centre of the window is often the natural split point, a different place may be chosen to accommodate a mullion or window/door frame.

Important note – Your two blinds will have a small gap to make room for the brackets.

Step 2 – Width Measurements

Split 1 blind annot smcoij

Step 2 – Width Measurements

Measure the distance between your split point and the edge of the recess. Use this figure as your width measurement when ordering your blind.

Important!

Outside your recess – If your blind is to be installed outside the recess, make sure to measure between the split point and the place on your wall that you’d like your blind to finish.

Check for any width obstructions – Potential obstructions within your recess, such as tiles, could impact the effective width. Determine this effective width by measuring between these points, and use this figure as your width measurement when placing your blind order. Here’s a tip: If the smallest width measurement is at the bottom of your recess due to an obstruction (like tiles), consider ordering an uncut pelmet. This way, you can trim it to size, ensuring it fills the entire width of your window recess at the top.

Mind the gap – Your split blinds will have a small gap (around 5mm) to make room for the brackets. This is determined by the distance between the central brackets.

Step 3 – Drop Measurements

Split just window annot 3 lzdhfy

Step 3 – Drop Measurements

Measure the height of your recess at multiple points, and use the smallest measurement as the drop when ordering your blinds.

Outside your recess – For outside recess installation, measure from where you want the headrail to start to where you want the blind to finish.

Check for any drop obstructions – We recommend a 70mm overlap beyond the top of the window recess. (Check for any drop obstructions.)

Overlap (bottom) – For the bottom overlap, consider obstructions like radiators. If the window sill protrudes by over 50mm, place the bottom bar at that point; otherwise, the bottom overlap is based on personal preference.

Step 4 – Fitting Option

Recess all other tpmtrx

Step 4 – Fitting Option

Select the “Recess” fitting option if your blinds will lie within the recess; Select the “Exact” fitting option if your blinds will sit outside the recess.

HAPPY MEASURING? SHOP WOODEN BLINDS

Angled Bay Window

Step 1 – Calculate Depth

Step 1 Check for obstruction rkmqx5

Step 1 – Calculate Depth

Obstruction Depth

For any obstructions, such as vents or handles, measure their furthest point from the window frame. This is the obstruction depth.

Total Depth Calculation

Wooden neetjf

Total Depth Calculation

Calculate your total depth by adding the depth of any obstruction to the required clearance for your blinds (55mm for 35mm slats, 70mm for 50mm or 63mm slats). This sum gives you the total depth.

Useful Suggestions

Example – If a window handle protrudes 46mm from the frame, the calculation for 50mm slats is 70mm + 46mm = 116mm total depth.

Note down this total depth as it will be crucial in the subsequent steps.

Do you have guide templates?

If you ordered blind samples, the templates should be included in your sample box.

Choose from the options below

Option 1: I've got the guides
This will make it simpler to measure for your bay window blinds.
Recommended
Option 2: I will make my own
Create your own measuring templates by following these simple steps.

Step 2 – Measuring Templates

Step 2   Measuring Templates in   ive got the guides dckldg

Step 2 – Measuring Templates

We offer measuring templates for bay windows (opt for these when ordering samples).

Using your measuring templates, mark them at the total depth (obstruction depth plus the relevant measurement on the bay measuring guide — e.g. 70mm for 50mm wooden slats)./p>

Step 3 – Mark Your Measuring Points

Step 3 Mark your measuring points in   ive got the guides aklcmx

Step 3 – Mark Your Measuring Points

Note: Check for obstructions like handles, and add their depth to the blind depth.

1.Lay the measuring cards flat on the window sill on either side of a bay corner.

2.Bring the cards together, aligning the tops with the window frames, until the total depth marks touch.

3.Keeping the cards flush to the window frames, use a pencil to mark where the total depth marks touch the window sill.

4.Repeat for each bay corner.

5.Mark end points based on your preference, being mindful of any obstructions.

Step 4 – Width Measurements

grey f4f6f5 sdyog7

Step 4 – Width Measurements

Now, you have measuring points at each corner and two end points. Measure the distance between the two points for each window. This is the width measurement for ordering each blind.

Step 4   Width measurements end points zcoifa

End Points

Measure the distance between the two measuring points for each window. This will give you the width measurement to use when ordering each blind.

Step 5 – Drop Measurements

edit annotated 2 1 omgcbb

Step 5 – Drop Measurements

For each window, measure the drop in three places. Use the smallest of these measurements as your drop figure when ordering your blind.

Step 6 (Final Step) – Recess

Recess all other eupvc2

Step 6 (Final Step) – Recess

When ordering, choose the “Recess” fitting option, indicating that adjustments for brackets should be made.

HAPPY MEASURING? SHOP WOODEN BLINDS

Step 2 – Measuring Templates

Pencil marking 2 exh36c

Step 2 – Measuring Templates

Here’s how you can create your own measuring templates using paper and a pen or pencil:

1. Lay two sheets of paper side by side.

2. With a ruler or tape measure, mark both sheets at the total depth (calculated in Step 1).

Step 3 – Mark Your Measuring Points

Step 3 Mark your measuring points manual yb7ubs

Step 3 – Mark Your Measuring Points

Please be aware: Inspect your window for obstructions like handles or vents. Include the depth of any obstruction to your blind’s depth.

1.Position measuring cards flat on the window sill at each side of a bay corner.

2.Align the cards, tops flush against the window frames, until the total depth marks touch.

3.Keep the cards flush and total depth marks in contact, marking the sill where they meet.

4.Repeat for each bay corner.

5.Mark your end points, being aware of any obstructions. These determine where your blinds will fit on each side.

Step 4 – Width Measurements

grey f4f6f5 sdyog7

Step 4 – Width Measurements

Now, you have measuring points at each corner and two end points. Measure the distance between the two points for each window. This is the width measurement for ordering each blind.

Step 4   Width measurements end points zcoifa

Measure the distance between the two measuring points for each window. This will give you the width measurement to use when ordering each blind.

Step 5 – Drop Measurements

edit annotated 2 1 omgcbb

Step 5 – Drop Measurements

For each window, measure the drop in three places. Use the smallest of these measurements as your drop figure when ordering your blind.

Step 6 (Final Step) – Recess

Recess all other eupvc2

Step 6 (Final Step) – Recess

When ordering, choose the “Recess” fitting option, indicating that adjustments for brackets should be made.

HAPPY MEASURING? SHOP WOODEN BLINDS

Square Bay Window

Choose from the options below

Option 1: Front Primary
The front blind spans the entire width of the bay, with the two side return blinds sitting behind.
Option 2: Side Primary
The front blind is positioned between the two side blinds, each of which span the full depth of the bay.

Front Primary

Step 1 – Width Measurement

Step 1 Front hcluob

Step 1 – Width Measurement

Measure the total width of the bay’s front window, including the frame. Use this figure as your width measurement when you order your front blind.

Important!

Obstruction depth – For any obstructions, such as vents or handles, measure their furthest point from the window frame. This is the obstruction depth; please make a note of this figure.

Step 2 – Depth Calculation

Wooden neetjf

Step 2 – Depth Calculation

Add the obstruction depth (previously calculated) to the required clearance for your blinds (55mm for 35mm wood slats, 70mm for 50mm or 63mm wood slats). This gives your total depth figure.

Useful Suggestions

Example – For a window handle that protrudes 46mm out from the window frame, the calculation with 50mm slats would be as follows: 70mm + 46mm = 116mm total depth.

Note the total depth as you will use this figure for the later steps.

Step 3 – Mark the Total Depth

Step 3 Mark total depth wwb4al

Step 3 – Mark the Total Depth

Mark the total depth  with a pencil on either side of your square bay window, as shown. In later steps, these marks are referred to as “total depth marks”.

Step 4 – Side Window Measurements

Step 4 Step 4 a Side Window Measurements sfadat

Step 4 – Side Window Measurements

Measure the distance from your total depth mark to where you want the return blind to end. This is your width measurement for ordering the return blind. Repeat for the other side of the square bay, ensuring you have a width measurement for each side blind.

Step 5 – Drop Measurements

step5 t6ijtc

Step 5 – Drop Measurements

Measure the height of the bay in at least three locations where you want to install your blind. Use the smallest of these figures as your drop measurement when ordering your blinds.

Step 6 – Recess Fitting Option

Recess all other eupvc2

Step 6 – Recess Fitting Option

When ordering, choose the “Recess” fitting option, indicating that adjustments for brackets should be made.

HAPPY MEASURING? SHOP WOODEN BLINDS

Side Primary

Step 1 – Width Measurement for the Sides

Step 1 a Width Measurement for the Sides wjg6ci

Step 1 – Width Measurement for the Sides

Measure the entire width of the bay’s side windows, including the frames. Use these measurements as your width references when ordering your side blinds.

Important!

Obstruction depth
Identify any obstructions, such as vents or handles, and measure their farthest point from the window frame. This measurement represents the obstruction depth. Measure and note the obstruction depth for each of your side windows; you’ll need these figures for later.

Step 2 – Depth Calculation for the Sides

Wooden neetjf

Step 2 – Depth Calculation for the Sides

Add the obstruction depth (previously calculated) to the required clearance for your blinds (55mm for 35mm wood slats, 70mm for 50mm or 63mm wood slats). This gives your total depth. Perform this calculation for each side window.

Useful Suggestions

Example – If your window handle protrudes 46mm from the window frame, the calculation would be as follows: 70mm + 46mm = 116mm total depth.

Note the total depth for each side window. Keep these figures handy for the later steps.

Step 3 – Mark the Total Depth

Step 3 Mark total depths psb4cg

Step 3 – Mark the Total Depth

Mark the total depth on either side of your square bay window using a pencil. These marks are referred to as “total depth marks” in later steps.

Step 4 – Width Measurement for the Front

Step 4 side rbgi1n

Step 4 – Width Measurement for the Front

Measure the distance between your two total depth marks. When ordering your front blind, use this figure as your width measurement.

Step 5 – Drop Measurements

Step 5 a Drop Measurements wpl1zj

Step 5 – Drop Measurements

Measure the recess height where you intend to install your blind, measuring at three separate points. Use the smallest of these figures as your drop measurement when making your order.

Step 6 – Recess Sizing

Recess all other eupvc2

Step 6 – Recess Sizing

When ordering, choose the “Recess” fitting option, indicating that adjustments for brackets should be made.

HAPPY MEASURING? SHOP WOODEN BLINDS